- Know what parts you need? Find our products here.
- Read on for troubleshooting information.. Scroll to the bottom for our videos.
- All of our Content is Free, Please Help Support our Site so we can continue to help! Support our Site.
- The 4wd system on your Yamaha ATV or Side by Side is operated by a push button switch that sends power to a relay, which in turn sends power to the servo motor, which engages your 2wd, 4wd, and difflock.
- Identifying and Locating 4wd Components
Push button switch– Located on the handlebars on ATV’s and the dash inside the cab on SxS’s. It lets you switch from 2wd, 4wd, difflock with the push of a button.
Relays– There are three relays that are responsible for the 4wd operation. On non diff lock models there are two and sometimes only one. On ATV’s they’re located either under the seat next to your fusebox or under the front rack near the battery. On SxS’s, they’re located under the front hood in the battery box. If either of these are faulty it can cause problems so always check each one.
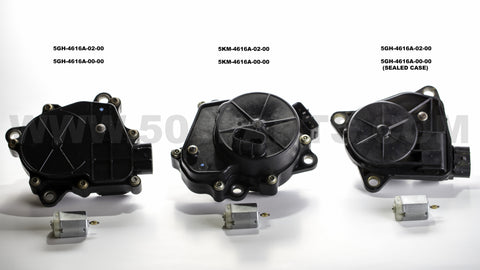
Servo Assembly– The servo assembly is the black plastic assembly that’s mounted on the rear or side of your front differential. The servo “motor” (as shown in the pictures) is housed inside the black plastic assembly. This motor is usually the culprit for most 4wd related problems.
While we do have complete servo assemblies available, there is no need to replace the entire assembly unless, A. you have somehow busted the black housing, B. the contacts are burnt inside the housing.
99% of the time, you can remove and open the servo assembly (as shown in the videos) and return your assembly to new condition by replacing the motor only.
There are four different types of servo assemblies. See the pictures below to identify which one you have.

If you’ve purchased a servo motor and need help installing it, scroll down and watch our installation videos.
Starting here, you’ll find a list of the most common issues with the Yamaha 4wd system. This is not all inclusive. Feel free to contact us if we can help you.
Problem 1 – 4wd not engaging, and when the push button is pressed nothing happens.
Step 1– Check the fuse
Step 2– Tap on the relays, one could be stuck (Two black with G8HN# on top and one white relay on most models.) Also check the connections on the servo and relays to make sure they’re connected properly.
Step 3– Remove the front diff servo and proceed to test it (need two c batteries, T-45 tamper proof torx, and a 6 mm allen. Some use 10mm regular hex bolts) see video Testing the Servo
If it tests bad, you can find a replacement motor here.
If you need the bits to remove it from the front diff you can find them at any parts store or you can order them here.
If it tests good, proceed to next step.
Step 4– Test the three relays. You’ll need a multi-meter set on the lowest ohms setting usually 200, and a short run of wire to power up the relays. See video Testing the Relays
and this relay testing video that covers all makes and models.
Testing the Relays All Makes/Models Version 2
If they test bad, you can find a replacement here.
If they test good, proceed to the next step.
Step 5– Test the push button switch (you’ll need a multi-meter set to ohms) see videos
Testing the Push Button Switch Version 2
Testing the Push Button Switch Version 1
For a switch that tests bad, you could try cleaning it before buying one. See video. Cleaning the 4wd Push Button Switch
If it tests bad after cleaning or you just want a new one, you can find it here.
If it tests good, proceed to the next step.
Step 6– At this point you are certain your servo, relays, and switch are good. Next, you’ll want to start tracing wires looking for anything that’s frayed or broken. Common places for problems are under the fusebox on SxS’s, under the front racks on the ATV’s. Also check the connections under the relays beneath the seat on the ATV’s. You may have to untape and untie your wires to get to the problem.
If you’ve tried all of this and still can’t get it going, you are welcome to call us at 501-658-0219 and we’ll help you through it.
Problem 2 – I replaced my servo motor and it works now but not properly. It most likely needs retimed.
Step 1– One thing that will make life easier is to make sure not to bolt the servo up to the diff before you know for certain it’s working. You can plug the servo in and just let it hang to verify proper operation. You need to have three things synced to 2wd before plugging the servo in. 1. You should have the slide gear inside the diff to 2wd mode. 2wd is to the left if you’re sitting on the seat or to the front of the bike for those that go back and forth instead of left and right. On the Rhinos, move the slide gear to the right for 2wd if you are sitting in the seat. 2. Next, have the button in 2wd. 3. Finally, have the servo itself timed to 2wd. Here are videos on cleaning and timing the servo.
Retiming the Servo (3B4/1HP)
Retiming the Servo 5KM
Problem 3– My ATV or SXS goes into 4wd or diff lock but will not come back out.
Step 1– Try tapping on or swapping your two black relays and see what happens (if something changes then one is bad) proceed to test the relays to determine which one is faulty.
See video Testing the Relays
Testing the Relays All Makes/Models Version 2
For a replacement visit here.
Problem 4 – My relays just click when I try and go in 4wd but I don’t hear the servo working.
Step 1– Ensure the connection on the servo is tight and connected properly. If it is proceed to next step.
Step 2– Remove the front diff servo and proceed to test it (need two c batteries, T-45 tamper proof torx, and a 6 mm allen. Some use 10mm regular hex bolts) see video Testing the Servo If it tests bad, you can find a replacement motor here.
If you need the bits to remove it from the front diff you can find them at any parts store or you can order them here.
While you are inside the diff, ensure the slide gear can be moved back and forth with your finger with ease. You may have to roll it a little to get it to move but should move freely. If it does not move freely, you can remove the allen screw cap and then remove the slide rod and gear with an allen wrench. The gear, rod and fork will come out. You can clean the slide rod up with emery cloth or light grit sandpaper.
Problem 5 – The slider on my 4wd push button is stuck and will not go left and right with ease.
Step 1- Watch this video. Cleaning and Repairing the 4wd Push Button Switch It will show you how to disassemble and repair the slider.
Problem 6 – I have a big ride tomorrow and I can’t get the 4wd to work. How do I manually put my ride in 4wd and just leave it until I can troubleshoot it?
Despite what mode you may be stuck in 2wd,4wd, diff lock. You can manually put the diff into whatever mode you like. If I was going to pick a mode to leave the diff in for a ride, it would be 4wd.
Step 1- Remove the servo from the front diff. You’ll see a slide gear inside the diff that moves left and right. Simply move that slide gear to the middle for 4wd. If you want to stay in 2wd, move it to the left for ATV’s and to the right for Rhino’s. Verify 2wd by jacking up the front wheels.
Step 2- Reinstall the servo on the diff being careful not to move the slide gear from where you left it. Enjoy your ride and return to this troubleshooting page when you return to fix your problem.
Problem 7 – My 4wd engages off and on without pressing the button.
Of course this is not an all inclusive list of possible 4wd problems. If you’re having trouble and need help feel free to contact us.
Check out our Testing and Troubleshooting Videos!!
4×4 Relay Locations
Yamaha Wolverine

Yamaha Viking

Wolverine X2

Free Service Manual Downloads!!

2004-2007 Rhino 660 Manual.pdf
2007-2013 Rhino 700Fi Manual.pdf
Rhino 700 Servo Relay Switch .pdf
2006-2010 Rhino 450 Manual.pdf
Rhino 450 Switch Relay Servo test.pdf
2014-2015 Yamaha Viking Service Manual.pdf
2016-2018 Yamaha Viking Service Manual.pdf
Wolverine 850 Service Manual.pdf